はじめに
弊社ではAWS Greengrassを使用してIoT機器からのデータ収集を行っています。
この記事では、AWS Greengrassを使用したセンサーデータの収集、それから収集したデータの可視化を行ってみます。
データの可視化については手っ取り早く行いたいので、Cloudwatchメトリクスを活用します。
そこで、今回はgreengrassとの連携に便利なAmazonCloudWatchメトリクスコンポーネント(aws.greengrass.Cloudwatch)を使用してみます。
やりたいこと
Raspberry PiとDHT-11センサー(温湿度センサー)を使用して温湿度データを収集し、リアルタイムで温度と湿度をモニタリング
もちろんRaspberry Piにはgreengrassを導入
以下使用機材
・Raspberry Pi
・DHT-11 (温湿度センサー)
・ジャンパーワイヤー (Raspberry Piと温湿度センサーを繋ぐため)
aws.greengrass.Cloudwatch
greengrassコンポーネントからaws.greengrass.Cloudwatchに対してカスタムメトリクスをPublishするとCloudwatchメトリクスに良い感じにデータを上げてくれる便利なコンポーネントです。
デプロイ
(今回は、greengrassの導入については割愛、Greengrassのインストールが完了した後の内容となります)
まずはコンポーネントのデプロイをしていきます。
AWS IoTのコンソールから「Greengrassデバイス」→「デプロイ」を行います
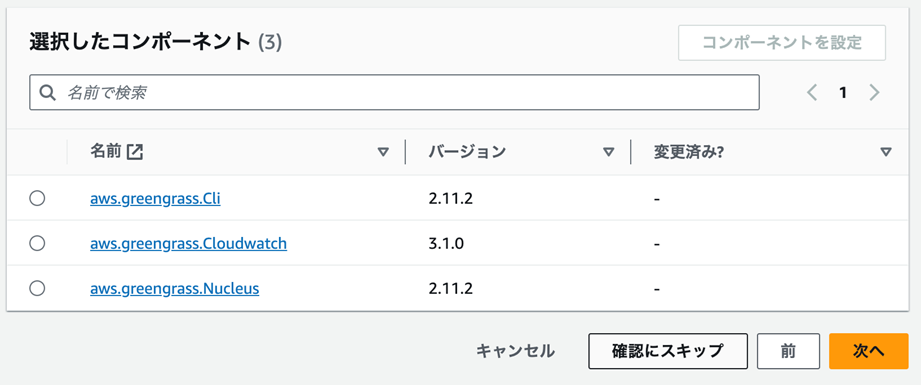
パブリックコンポーネントからaws.greengrass.Cloudwatchを探します

最低限以下のコンポーネントもデプロイしておきます
送受信トピックについて
aws.greengrass.Cloudwatchをデプロイするとデフォルトでは、以下のtopicでローカル間通信が可能となります
メトリクス送信
cloudwatch/metric/put
メトリクス送信結果受信
cloudwatch/metric/put/status
(上記トピックはデプロイ時に任意のトピックに変更可能ですが、今回はデフォルトのトピックのまま)
コンポーネントに必要な権限の付与
このコンポーネントには以下のアクセス権を付与しておく必要があります。
下記ポリシーを作成してGreengrassV2TokenExchangeRoleへアタッチ
{
    "Version": "2012-10-17",
    "Statement": [
        {
            "Action": [
                "cloudwatch:PutMetricData"
            ],
            "Effect": "Allow",
            "Resource": "*"
        }
    ]
}
正常にデプロイが完了したら、これで準備完了
あとは自作のコンポーネントからaws.greengrass.CloudwatchのトピックへとPublishします
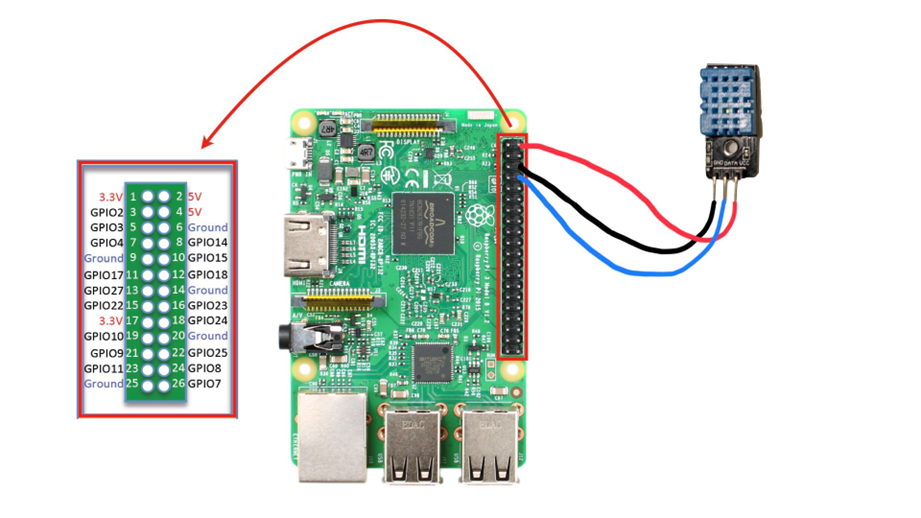
ラズパイとDHT-11の準備
ラズパイとDHT-11については以下の図のように繋いだ
自作コンポーネントの作成 (温湿度測定~メトリクス送信)
アーティファクト作成
センサーのデータ取得処理がかなりのボリュームだが、参考程度にソースコードも載せておきます
com.example.temp_humi_pub.py
1分間隔で温湿度を測定してaws.greengrass.CloudwatchへPublish/Subscribeを行う
import RPi.GPIO as GPIO
import time
import datetime
import uuid
import dht11

import awsiot.greengrasscoreipc
import awsiot.greengrasscoreipc.client as client
from awsiot.greengrasscoreipc.model import (
    PublishToTopicRequest,
    PublishMessage,
    JsonMessage,
    SubscribeToTopicRequest,
    SubscriptionResponseMessage
)

# topic
PUB_TOPIC = "cloudwatch/metric/put"
SUB_TOPIC = "cloudwatch/metric/put/status"

# 例外クラス
class ReadError(Exception):
    pass

# Subscriberクラス
class StreamHandler(client.SubscribeToTopicStreamHandler):
    def __init__(self):
        super().__init__()

    def on_stream_event(self, event: SubscriptionResponseMessage) -> None:
        log("subscribe: {}".format(event.json_message.message))


    def on_stream_error(self, error: Exception) -> bool:
        return True

    def on_stream_closed(self) -> None:
        pass

# ログ出力関数
def log(message):
    dt_now = datetime.datetime.now()
    with open('/tmp/com.example.temp_humi_pub.log', 'a') as f:
        print("{} {}".format(dt_now, message), file=f)

# Macアドレス取得関数
def get_mac_address():
    mac = ':'.join(['{:02x}'.format((uuid.getnode() >> elements) & 0xff) for elements in range(0,2*6,2)][::-1])
    return mac

# publish関数
def publish_data(message):
    publish_message = PublishMessage()
    publish_message.json_message = JsonMessage()
    publish_message.json_message.message = message

    request = PublishToTopicRequest()
    request.topic = PUB_TOPIC
    request.publish_message = publish_message

    operation = ipc_client.new_publish_to_topic()
    operation.activate(request)
    future = operation.get_response()
    future.result(10)

    log("publish :{}".format(message))


if __name__ == '__main__':

    # initialize GPIO
    GPIO.setwarnings(True)
    GPIO.setmode(GPIO.BCM)

    # read data using pin 14
    instance = dht11.DHT11(pin=14)

    ipc_client = awsiot.greengrasscoreipc.connect()

    # subscribe
    request = SubscribeToTopicRequest()
    request.topic = SUB_TOPIC
    handler = StreamHandler()
    operation = ipc_client.new_subscribe_to_topic(handler)
    future = operation.activate(request)
    future.result(10)

    # macアドレス取得
    mac_address = get_mac_address()

    while True:

        try:
            # 最大10回
            for i in range(10):
                result = instance.read()

                if result.is_valid():
                    temperature = result.temperature
                    humidity = result.humidity
                    break

                time.sleep(0.5)
            else:
                raise ReadError

            log("Temperature: {} C".format(temperature))
            log("Humidity: {} %".format(humidity))


            timestamp = int(time.time())
            datas = {"Temperature":temperature, "Humidity":humidity}

            for key in datas:
                # メトリクス用メッセージ
                message = {
                    "request": {
                        "namespace": "TempHumi",
                        "metricData": {
                            "metricName": key,
                            "dimensions": [{ "name": "Device", "value": mac_address}],
                            "timestamp": timestamp,
                            "value": datas[key],
                            "unit": "Count"
                        }
                    }
                }

                publish_data(message)

        except ReadError:
            log("ReadError")

        except Exception:
            log("Exception")
            break

        time.sleep(60)

    log("clean up")
    GPIO.cleanup()
dht11.py
DHT11から温度と湿度を取得する。
import RPi.GPIO as GPIO
import time

class DHT11Result:
    'DHT11 sensor result returned by DHT11.read() method'

    ERR_NO_ERROR = 0
    ERR_MISSING_DATA = 1
    ERR_CRC = 2

    error_code = ERR_NO_ERROR
    temperature = -1
    humidity = -1

    def __init__(self, error_code, temperature, humidity):
        self.error_code = error_code
        self.temperature = temperature
        self.humidity = humidity

    def is_valid(self):
        return self.error_code == DHT11Result.ERR_NO_ERROR

class DHT11:
    'DHT11 sensor reader class for Raspberry'

    __pin = 0

    def __init__(self, pin):
        self.__pin = pin

    def read(self):
        GPIO.setup(self.__pin, GPIO.OUT)

        # send initial high
        self.__send_and_sleep(GPIO.HIGH, 0.05)

        # pull down to low
        self.__send_and_sleep(GPIO.LOW, 0.02)

        # change to input using pull up
        GPIO.setup(self.__pin, GPIO.IN, GPIO.PUD_UP)

        # collect data into an array
        data = self.__collect_input()

        # parse lengths of all data pull up periods
        pull_up_lengths = self.__parse_data_pull_up_lengths(data)

        # if bit count mismatch, return error (4 byte data + 1 byte checksum)
        if len(pull_up_lengths) != 40:
            return DHT11Result(DHT11Result.ERR_MISSING_DATA, 0, 0)

        # calculate bits from lengths of the pull up periods
        bits = self.__calculate_bits(pull_up_lengths)

        # we have the bits, calculate bytes
        the_bytes = self.__bits_to_bytes(bits)

        # calculate checksum and check
        checksum = self.__calculate_checksum(the_bytes)
        if the_bytes[4] != checksum:
            return DHT11Result(DHT11Result.ERR_CRC, 0, 0)

        # ok, we have valid data

        # The meaning of the return sensor values
        # the_bytes[0]: humidity int
        # the_bytes[1]: humidity decimal
        # the_bytes[2]: temperature int
        # the_bytes[3]: temperature decimal

        temperature = the_bytes[2] + float(the_bytes[3]) / 10
        humidity = the_bytes[0] + float(the_bytes[1]) / 10

        return DHT11Result(DHT11Result.ERR_NO_ERROR, temperature, humidity)

    def __send_and_sleep(self, output, sleep):
        GPIO.output(self.__pin, output)
        time.sleep(sleep)

    def __collect_input(self):
        # collect the data while unchanged found
        unchanged_count = 0

        # this is used to determine where is the end of the data
        max_unchanged_count = 100

        last = -1
        data = []
        while True:
            current = GPIO.input(self.__pin)
            data.append(current)
            if last != current:
                unchanged_count = 0
                last = current
            else:
                unchanged_count += 1
                if unchanged_count > max_unchanged_count:
                    break

        return data

    def __parse_data_pull_up_lengths(self, data):
        STATE_INIT_PULL_DOWN = 1
        STATE_INIT_PULL_UP = 2
        STATE_DATA_FIRST_PULL_DOWN = 3
        STATE_DATA_PULL_UP = 4
        STATE_DATA_PULL_DOWN = 5

        state = STATE_INIT_PULL_DOWN

        lengths = [] # will contain the lengths of data pull up periods
        current_length = 0 # will contain the length of the previous period

        for i in range(len(data)):

            current = data[i]
            current_length += 1

            if state == STATE_INIT_PULL_DOWN:
                if current == GPIO.LOW:
                    # ok, we got the initial pull down
                    state = STATE_INIT_PULL_UP
                    continue
                else:
                    continue
            if state == STATE_INIT_PULL_UP:
                if current == GPIO.HIGH:
                    # ok, we got the initial pull up
                    state = STATE_DATA_FIRST_PULL_DOWN
                    continue
                else:
                    continue
            if state == STATE_DATA_FIRST_PULL_DOWN:
                if current == GPIO.LOW:
                    # we have the initial pull down, the next will be the data pull up
                    state = STATE_DATA_PULL_UP
                    continue
                else:
                    continue
            if state == STATE_DATA_PULL_UP:
                if current == GPIO.HIGH:
                    # data pulled up, the length of this pull up will determine whether it is 0 or 1
                    current_length = 0
                    state = STATE_DATA_PULL_DOWN
                    continue
                else:
                    continue
            if state == STATE_DATA_PULL_DOWN:
                if current == GPIO.LOW:
                    # pulled down, we store the length of the previous pull up period
                    lengths.append(current_length)
                    state = STATE_DATA_PULL_UP
                    continue
                else:
                    continue

        return lengths

    def __calculate_bits(self, pull_up_lengths):
        # find shortest and longest period
        shortest_pull_up = 1000
        longest_pull_up = 0

        for i in range(0, len(pull_up_lengths)):
            length = pull_up_lengths[i]
            if length < shortest_pull_up:
                shortest_pull_up = length
            if length > longest_pull_up:
                longest_pull_up = length

        # use the halfway to determine whether the period it is long or short
        halfway = shortest_pull_up + (longest_pull_up - shortest_pull_up) / 2
        bits = []

        for i in range(0, len(pull_up_lengths)):
            bit = False
            if pull_up_lengths[i] > halfway:
                bit = True
            bits.append(bit)

        return bits

    def __bits_to_bytes(self, bits):
        the_bytes = []
        byte = 0

        for i in range(0, len(bits)):
            byte = byte << 1
            if (bits[i]):
                byte = byte | 1
            else:
                byte = byte | 0
            if ((i + 1) % 8 == 0):
                the_bytes.append(byte)
                byte = 0

        return the_bytes

    def __calculate_checksum(self, the_bytes):
        return the_bytes[0] + the_bytes[1] + the_bytes[2] + the_bytes[3] & 255
S3への配置
上記のソースコードはS3の任意のバケットへ配置しておきます
(このパスを後述のレシピで使用)
greengrassコンポーネントの作成
AWS IoTのコンソールから「Greengrassデバイス」→「コンポーネント」→「コンポーネントの作成」を行います
下記レシピでコンポーネントの作成
コンポーネント名はcom.example.temp_humi_pubとしました。
{
    "RecipeFormatVersion": "2020-01-25",
    "ComponentName": "com.example.temp_humi_pub",
    "ComponentVersion": "1.0.0",
    "ComponentDescription": "Measurement of temperature and humidity.",
    "ComponentPublisher": "AWS",
    "ComponentConfiguration": {
        "DefaultConfiguration": {
            "accessControl": {
                "aws.greengrass.ipc.pubsub": {
                    "com.example.temp_humi_pub:pubsub:1": {
                        "operations": [
                            "aws.greengrass#PublishToTopic"
                        ],
                        "resources": [
                            "cloudwatch/metric/put"
                        ]
                    },
                    "com.example.temp_humi_pub:pubsub:2": {
                        "operations": [
                            "aws.greengrass#SubscribeToTopic"
                        ],
                        "resources": [
                            "cloudwatch/metric/put/status"
                        ]
                    }
                }
            }
        }
    },
    "Manifests": [
        {
            "Platform": {
                "os": "linux"
            },
            "Lifecycle": {
                "Run": {
                    "RequiresPrivilege": true,
                    "script": "python3 {artifacts:path}/temp_humi_pub.py"
                }
            },
            "Artifacts": [
                {
                    "Uri": "s3://<バケットパス名>/com.example.temp_humi_pub/1.0.0/temp_humi_pub.py",
                    "Unarchive": "NONE",
                    "Permission": {
                        "Read": "OWNER",
                        "Execute": "NONE"
                    }
                },
                {
                    "Uri": "s3://<バケットパス名>/com.example.temp_humi_pub/1.0.0/dht11.py",
                    "Unarchive": "NONE",
                    "Permission": {
                        "Read": "OWNER",
                        "Execute": "NONE"
                    }
                }
            ]
        }
    ],
    "Lifecycle": {}
}IoTCoreへのPublishはaws.greengrass.Cloudwatchが行ってくれるため、自作コンポーネントではローカル間のアクセスコントロール設定のみでOK
デプロイ
AWS IoTのコンソールから「Greengrassデバイス」→「デプロイ」→「作成」を行います
デプロイ情報を記載、デプロイターゲットを選択して
「マイコンポーネント」から上記で作成したコンポーネントを選択します。

以上でデータ収集が可能になりました。
しばらく放置させてデータを収集させてみました
Cloudwatchメトリクス
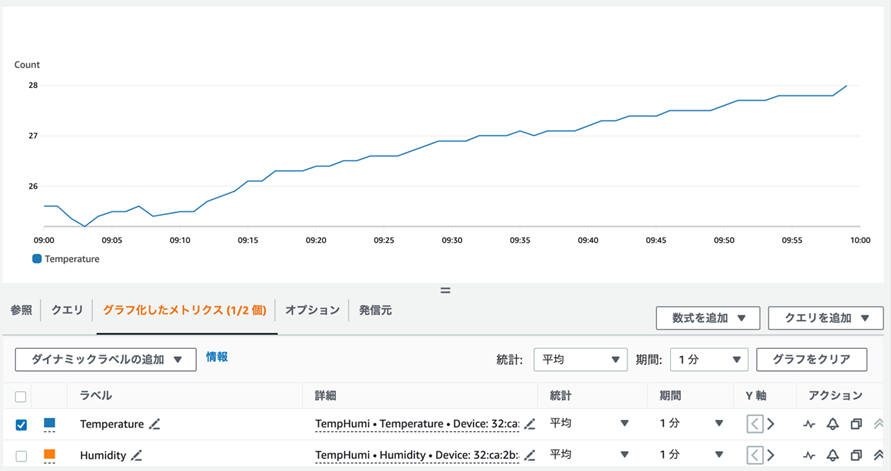
温湿度センサーから収集したデータはCloudwatchメトリクス上で確認可能です
早速データを見てみましょう
Cloud Watchのコンソールから「メトリクス」→「すべてのメトリクス」
温度のメトリクス
湿度のメトリクス
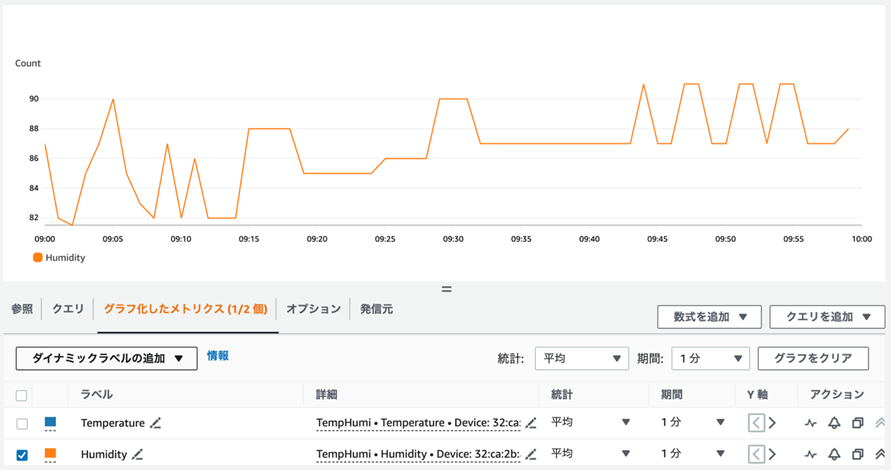
多少のブレはあるものの我が家のちゃんとした温湿度計とほぼ同じような値となっていました。
以上、AWS greengrassでAmazonCloudWatchメトリクスコンポーネント(aws.greengrass.Cloudwatch)を使用したデータの可視化についてでした

